 |
PROFESSIONAL PHOTOGRAPHY TIPS AND TECHNIQUES
|
Photography Tip #6:
Vertical vs Horizontal Orientation - an aspect of composition
Vertical vs Horizontal Orientation - an aspect of composition
Ask the photo processing technician at your local supermarket or department store which photo orientation is the most common one to go through their machines. What they have to say may surprise you. Believe it or not, well over 90% of all photos uploaded to photo lab machines have been shot in a horizontal orientation. Why? Simply because all cameras are manufactured in such a way that they are made to be held horizontally.
In fact, it takes a bit of practice to turn some heavier cameras sideways without a bit of difficulty. The shutter button on the top right-hand side is, from an ergonomics standpoint, most comfortable and efficient when used by right-handed people with the camera held horizontally. Because of this, most amateur photographers never think to turn the camera on its side.
What's The Difference? Quite simply, some subject matter and/or photographic elements can be shot in a much more attractive manner by merely switching from a horizontal to a vertical format. (This is like the difference between printing a page of text as a "portrait" orientation as opposed to a "landscape" orientation. Much of what people shoot with their cameras is sideways, much like a landscape orientation.)
Think about the focal point and what surrounds or leads the eye to it. If your subject matter is vertical or if lines and other visual elements lead the eye to your subject in a vertical manner, then shoot it vertically.
Here's another way to consider this. Imagine that you're in the market for a new car. You visit the dealership and find a new model that piques your interest. Your spouse is not with you, but you realize that they need to see the vehicle to share your excitement. You pull your camera out of your pocket and snap a few shots to bring home and show it off. Now ask yourself; would you ever even think about taking a vertical photo of the horizontal car? Of course you wouldn't. So, then, why would you ever take a horizontal photo of something that's mainly vertical?
Think about the language of desktop printers; it's quite interesting that we rarely think about the printer orientation term "portrait", insofar as it relates to taking photographs of people, but that's where the term came from! People photos are commonly referred to as "portraits". When you think about the orientation of the professionally produced portraits that may hang on your walls, you'll realize that most of them have a vertical orientation. This is generally because the human form is longer than it is wider. In the case of tight close-ups, again, the head is more vertical than it is horizontal. As such, the portrait tends to lend itself to a vertical orientation more often than it does a horizontal frame. Consider the examples below; there was no good reason to frame the woman on the left horizontally other than the fact that most amateurs don't think to turn the camera on its side.
Generally speaking, most images of human subjects look better when composed vertically. In the example below, the vertical orientation is an obvious necessity. The model's vertically-inclined outstretched arms demand that the camera capture them vertically. The eye travels up the arms and rests with the face - the focal point. As well, the image makes sense this way.
By contrast, the horizontal perspective to the left has an odd appearance. Not only does this orientation discourage viewer eye movement, it also makes the model's hands look out of place. At first glance, we're not really sure if she these are her own hands or someone else; and if they are someone else's hands, the message becomes mixed-up.
By contrast, the horizontal perspective to the left has an odd appearance. Not only does this orientation discourage viewer eye movement, it also makes the model's hands look out of place. At first glance, we're not really sure if she these are her own hands or someone else; and if they are someone else's hands, the message becomes mixed-up.
 Why shoot this horizontally? |
 Vertical orientation is better. |
Sometimes framing a face horizontally can make it appear wider. The example below demonstrates this phenomenon:
 |
 |
There are exceptions to this general rule.
Be observant as to what your subject may be doing and how their body is situated, and look for shape and lines in the environment. The photo of the woman shown below actually works better in a horizontal orientation. Why?
 In the example above, it's easy to see how the subject's arm position calls for a horizontal frame. Compared to the image to the right, the above horizontal perspective is preferable.
|
 |
When you are trying to decide on the orientation of your photos, think about the general orientation of the subject or of your focal point and let this be your guide. As well, look at how anticipated horizontal or vertical motion will tell you whether or not to turn your camera on its side. Every consider where the term "horizon" comes from? With the exception of the vertical rainbow in the images at the bottom of this page, most horizons are "horizon-tal" (that's where the word comes from). Rhythmic repetitive patterns and/or lines will also make your decision for you as the images below suggest.
Whether you're strolling on a tropical beach while on vacation, hiking in the woods, hitting the sight-seeing, at a family gathering or just going out with your camera to express your creativity, always try to see if the elements in the frame you're composing lend themselves more to the standard horizontal or the less commonly used vertical.
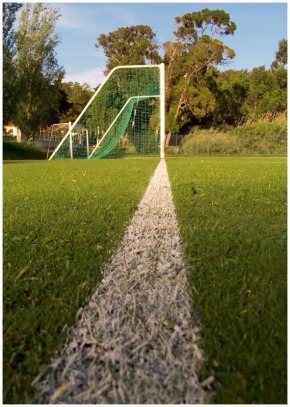 This chalk line to the soccer net cries for a vertical orientation!  These train tracks run horizontally along the ground, but with a bit of creative perspective work they reach upward to the top left corner of the frame. Vertical wins!  Think 'Horizon' = horizon-tal 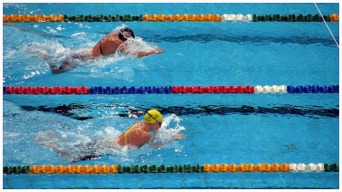 Our eyes want to move along with the swimmers. As a result, the horizontal orientation is crucial. |
 Look at how the golf club lines up vertically with the golfer's body.  You're on vacation in Paris and the Eiffel Tower is calling you...get beneath tall things and look up. Hold your camera sideways!  The rhythmic horizontal lines are part of what makes this image visually appealing. The dog is looking left, horizontally. A horizontal orientation is required.  The body shape is now more horizontal, so the frame should be as well. |
 The subject (rainbow) is vertical, so WHY shoot it horizontally? |
 This vertical orientation SHOWCASES the vertical subject. |
Now that you know how to decide on the frame's orientation,
don't be afraid to turn your camera on its side!
don't be afraid to turn your camera on its side!
FreePhotoCourse.com is your home for top-shelf photography lessons, digital camera tips, step-by-step how-to's,
royalty-free pictures, desktop wallpapers, interviews with top international photographers and more!
© FreePhotoCourse.com. All rights reserved. Reproduction, storage, copying, publishing, manipulation, digitizing or selling of any of the text or photos on this website is strictly prohibited. Under no circumstances shall any part of the content on this website be plagiarized or referenced as the work of an author or photographer. Re-selling of any of the content on this site is strictly prohibited. The lessons on this website were provided free of charge for individual home users; if you paid for any of this you have been cheated. Please report any misuse, sale or plagiarism of this material here OR E-MAIL US AT: CONTACT@FREEPHOTOCOURSE.COM
Browse, learn, purchase and explore with confidence.
Certified virus-free, malware-free, spyware-free, scam-free and spam-free.
Associate-Sponsor Disclosure Content Download & Terms of Use Privacy Policy Contact Us Contributor's Gallery Terms of Use Forum Terms of Use
Certified virus-free, malware-free, spyware-free, scam-free and spam-free.
Associate-Sponsor Disclosure Content Download & Terms of Use Privacy Policy Contact Us Contributor's Gallery Terms of Use Forum Terms of Use